Beauty Tips
 |
| Draping with MAC Peachykeen Blush |
The actual technique of draping is not new to makeup artistry. It is the art of using blusher to chisel the cheeks. You can do this in multiple ways:
1. With one blusher: Use a pigmented blusher beneath the cheekbone just under the apples of the cheeks and gradually pale away to the top. I find MAC Sheertone blushes to be excellent for this purpose as they contain no shimmer and are easily buildable.
2. With two blushers: Apply a darker blush where you would apply contour powder, just beneath the apples of the cheeks, and pat a paler blush on the apples.
You can use as many shades as you like to create a gradient effect. Just make sure the darker shades are at the bottom, with lighter shades on top.
1. With one blusher: Use a pigmented blusher beneath the cheekbone just under the apples of the cheeks and gradually pale away to the top. I find MAC Sheertone blushes to be excellent for this purpose as they contain no shimmer and are easily buildable.
2. With two blushers: Apply a darker blush where you would apply contour powder, just beneath the apples of the cheeks, and pat a paler blush on the apples.
You can use as many shades as you like to create a gradient effect. Just make sure the darker shades are at the bottom, with lighter shades on top.
For my wedding makeup look last year (pictured), my MUA used the first method. He used MAC Peachykeen blush on the cheekbones and faded away to the top of the apples of my cheeks. If he named it 'Draping' then, he would be ahead of the times!
Are you a fan of contouring and what do you think about the 'Draping' technique?
Livia | The Skin and Beauty Blog

 |
| 50 New Year’s Resolutions for a More Beautiful You! |
Quit bad beauty habits
1. Quit Nail biting. Not only are chipped nails unsightly, but did you know that you can get worms from biting your fingernails? Wearing coloured nail varnish can help you stop.
2. Quit picking on your skin and pimple popping. These habits can lead to facial scarring.
3. Stop smoking.
4. Stop using tanning beds, which can increase your risk of skin cancer. Try fake tans instead!
Get Organized
5. Clean out your closet. Check out Anna's tips on Capsule Wardrobes.
6. Reorganize your makeup drawer.
7. Clean out your makeup bag.
Better Hygiene!
8. Toss your pillowcases in the wash every week, especially in the summer to remove the build up of sweat and oils from your face and hair, which can cause breakouts.
9. Clean your mobile phone at least once a week. Ever notice that the right side of your jaw has a few more blemishes than you'd expect? That could be from all the bacteria on your mobile! You can use a tiny bit of rubbing alcohol on a tissue and gently wiping down your phone.
10. Don’t share makeup with friends! This is the easiest way to transfer germs, get a pink eye or even cold sores (herpes).
11. Avoid trying makeup testers at makeup counters for this same reason.
12. Get rid of your mascara every 6 months as they are a breeding ground for bacteria. You can attach a label to your mascara with the ‘expiry’ date or the date of opening to remind you when you’ll have to throw it out.
13. Throw out your old makeup sponges after use to prevent re-using dirty and bacteria-laden sponges.
14. Clean your lip and eye pencils every month by sharpening them.
15. Clean your makeup brushes weekly to prevent the build up of dirt and oils, which can lead to breakouts and infections.
Try a new Look
16. Try a new beauty dare once a month! It may be red lipstick or winged eye liner, who knows – you might find a new look that suits you.
17. Experiment with new fashion trends. Breaking out from the usual black and adding in a new colour or accessory can instantly transform any outfit.
18. Change your hairstyle - If you can't remember the last time you got a different style, now is the perfect opportunity to go a little shorter, get a fringe, or add a few face-framing layers.
Better shopping habits
19. Get the perfect shade of foundation by using your jawline to test. This is the most evenly toned area of your face. Don’t use your arm or hand as your skin colour may be completely different!
20. Wear blush for that instant pick-me-up!
21. Find affordable style and save money eg. Primarni and H&M
Get a healthier glow!
22. Get at least 6-8 hours of beauty sleep. This gives your body enough time to revitalise itself.
23. Relax and give yourself a time out now and then to reduce stress and accelerated ageing that goes with it.
24. Schedule a beauty date with your best friend, sister, or mum. That way, you can both feel indulged and have some quality catch-up time.
25. Hit the gym at least 3 times a week for a naturally glowing complexion and a hot body!
26. Drink more water – at least 2 litres of water a day to flush toxins out of your body and keep skin looking supple and healthy
27. Eat more good-for-your-skin foods like vegetables, salmon, almonds, and berries.
28. Take a multivitamin every day - I love Holland & Barrett Pure Cod Liver Oil Multi-vitamins.
Gain new beauty habits
29. Maintain your eyebrows with monthly threads or waxes. Clean eyebrows instantly improve your look!
30. Commit to a skin-care routine. Try a new regimen for at least two weeks before changing products, as this is the amount of time it usually takes for a formula's results to show.
31. Apply a moisturiser with at least SPF 30 to your face, neck and body prevent premature aging.
32. Don’t forget to apply SPF on your hands, especially before driving to prevent the sun’s UV effects on your hands!
33. Start using an eye cream. It's never too early or late to fight fine lines and wrinkles!
34. Use a body brush a few minutes before your morning shower to shift cellulite.
35. Moisturise after your daily bath or shower while your skin is still a little damp as your skin absorbs better at this time than when it is completely dry.
36. Start using a toner to clean your skin and also tighten pores.
37. Remove your makeup at the end of the day by either washing them off or keeping cleansing wipes by your bedside to prevent clogged pores!
38. Exfoliate your skin once a week using mild soap and a washcloth, loofah or exfoliating gloves (my favourite!).
39. Avoid taking very hot steamy showers as this can dry out your skin.
40. Start using a product with glycolic acid or retinol, which can help prevent and dissolve fine lines, hyperpigmentation, uneven skin texture and acne.
Take better care of your hair.
41. Shampoo your hair every 2 days as washing your hair daily can strip it off its natural oils.
42. Don’t comb your hair immediately after you shower to avoid breakage. Instead, wrap it in a towel and let it dry for 10 minutes.
43. Use a wide-toothed comb to comb newly washed hair. This reduces chances of split ends.
44. Invest in an ionic hair dryer, which is gentler to hair and also dries your hair faster!
45. Avoid using the flatiron too often.
46. Use a heat protectant spray before using hot hair styling products.
47. Stop splitting your ends, instead trim them to prevent damaging your hair.
Improve dental care
48. Floss your teeth daily. Did you know that brushing alone cleans only 65% of your teeth?
49. Keep a toothbrush at your desk and brush after you finish your coffee or tea. This will help prevent staining.
And lastly…
50. Be flawsome! Start loving yourself for who you are, this includes wrinkles, flab, cellulite etc. Use these to guide self-improvement instead of self-loathing, and don’t let these hold you back!

Confused about which flirty falsies to wear for that special night out?
Amidst the sea of lashes in the world, there are a few brands we always turn to. A higher price tag does not necessarily mean higher quality and some of the best are available from your local drugstore. Here are a few tips on what we look for in a good pair of falsies:
.jpg)
Do you suffer from red cheeks, sallow skin, dark under eye circles or does your skin just need a bit of a glow?
MAC Cosmetics are launching the MAC Prep + Prime Colour Correct Collection designed to fix our uneven skin tone woes with the use of coloured powders and creams. Powders will be available as loose powders and pressed compacts. These colours will be available in cream form that come with SPF 30.
Correctors are different from concealers. Correctors act to neutralise colour, whereas concealers act to cover up. You can use them both in looks or one or the other depending on your skin's needs.
I like using these types of products underneath my overall foundation or face powder.
I like using these types of products underneath my overall foundation or face powder.
How to colour correct using makeup

Want to avoid makeup mayhem this holiday season? Here are our tips to help you look your best in your photos this Christmas!


Dolce & Gabbana, Valentino, DKNY
To get this look:
1. Moisturise your skin. I use 2 sprays of NUXE Huile Prodigieuse oil to cover my entire face and neck.
2. Mix 1 pump of Sleek Makeup New Skin Revive Foundation and 2 pumps of MAC Oil Control Lotion.
1. Moisturise your skin. I use 2 sprays of NUXE Huile Prodigieuse oil to cover my entire face and neck.
2. Mix 1 pump of Sleek Makeup New Skin Revive Foundation and 2 pumps of MAC Oil Control Lotion.
3. With a MAC 188 brush or fingertips, apply and blend the mixture all over the face and neck,
4. Highlight the bridge of your nose, cheekbones, and underneath the eyebrows with a creamy highlighter - I love using MAC Pearl Cream Colour Base.
Tidy your brows, put on mascara, blush and some lip balm - and you're good to go!
.JPG)
Here I am using all the products mentioned above, including Bourjois Queen Attitude Mascara
Etude House Brow Pencil, NARS Deep Throat Blush and MAC Cut a Caper Lipstick.


Lanvin, Diane von Furstenberg, Versace


Zac Posen, Versace, Etro
Time to grow those brows girls! Bold brows are back!
There are two varieties - big bushy untamed ones, and clean shapely full ones. I much prefer the latter.
If your brows are on the full side - you're in luck!
For ladies with thinner brows opting for this look, I recommend growing your brows (yes leave them alone) for 2 weeks and then go to a professional to have them threaded and reshaped to your preference.
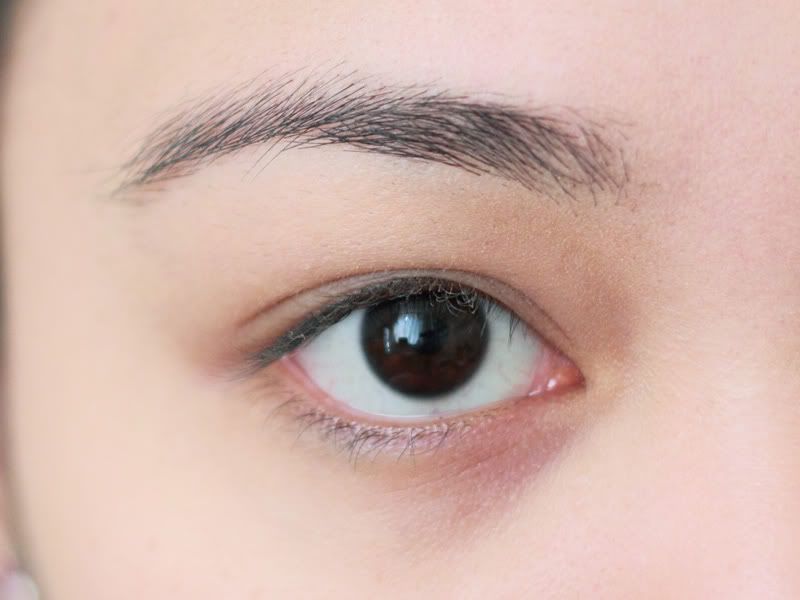
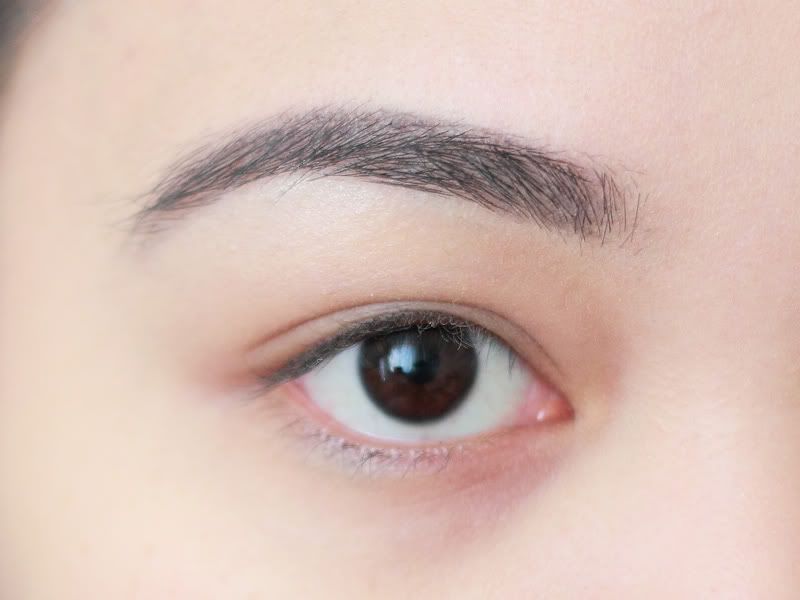
before, after
For tips on getting clean bold brows, read my very extensive Eyebrow Tutorial here: All About Brows | My Eyebrow Tutorial - It includes my tips on eyebrow shaping, trimming, colouring and shading.
Also, here's a link to a quick review of my favourite eye brow pencil: Etude House Drawing Eye Brow Pencil
What do you think of this trend? ♥
Livia xx
Livia xx
Weathered Cheeks


Berry Lips


"Emphasize your eyes OR lips - not both."
These are just my opinions, but I believe in the saying that when wearing makeup, the emphasis should be on eyes or lips, but not both. I find that wearing heavy shimmery pigmented eye makeup with dark lips can be a bit too much, leaning over to drag queen ish (unless it's the look you're going for).
I find that dark berry lips look best with minimal eye makeup - like in the models above with matte skin-toned eyeshadow, winged black liner and mascara +/- false lashes - vintage/retro style. Among the celebrity looks above, I like Lana del Rey's and Jessica Alba's the most. The peachy shimmers on Emma Stone and Rihanna's eyelids seem a bit too much for the overall look.
"Lip Liners are a must with dark lipsticks."
When it comes to dark lipstick shades, wearing a lip liner is a must.
Lip liners prevent the product from bleeding outside your lip line.
Lip liners also help you apply your dark lipstick with more accuracy.
When I'm in a rush, I tend to use a lip pencil as an overall lip colour, then I top it off with some clear gloss if I want the glossy look. If you're on a tight budget, you can just purchase a single creamy dark lip pencil and you're set for this trend!
Here are my picks from my personal collection:

And swatches:

MAC Brick lip pencil, MAC So Scarlet lipstick, NYX Mahogany lip pencil, MAC Dark Deed lipstick, NYX Currant lip pencil, MAC Rebel lipstick, MAC Mahogany lip pencil, MAC Kittenish lipstick

MAC So Scarlet lipstick, MAC Kittenish lipstick, MAC Dark Deed lipstick, MAC Rebel lipstick

Sleek Mossberry Kohl Pencil, NYX Currant lip pencil, NYX Mahogany lip pencil, MAC Mahogany lip pencil, MAC Brick lip pencil
As I implied earlier, MAC Rebel lipstick was the popular shade of last year's winter, and I just added it here for comparison.
For lip pencils, I recommend MAC, NYX, Rimmel and Maybelline. I know these brands provide lip pencils in very creamy consistencies with minimal tugging.
If you're not used to dark lips, it can be intimidating to try out this trend. It takes confidence to wear but I'm sure if you apply this shade correctly and wear appropriate eye makeup, you can definitely pull it off!

MAC Brick Lip Pencil and MAC So Scarlet Lipstick, Neutral colours for eyes
Last week, I was invited to the M.A.C BAFTA TV Mock-up Suite event held at the luxurious Corinthia Hotel. MAC Cosmetics is the Official Beauty Partner of the Arqiva British Academy Television Awards - 9th year running!, and MAC Senior Artist Cher Webb gave us a ‘camera ready’ beauty masterclass on this year's looks for the red carpet.
.jpg)
Cher created 2 looks for us:
The first look was a day-time glamour with beautiful radiant skin and light peach lips.
.jpg)
She used MAC Face and Body Foundation (one of my favourites) and the new MAC foundation/concealer palettes (coming soon! can't wait!!) to give a very natural-looking flawless base. For the eyes, MAC Groundwork paint pot was applied on to the eyelids and lower lash line for some colour. MAC Arena eyeshadow (a shimmery natural peach) was dusted over it and, MAC Pro Longwear eye pencil in Lord It Up (brown) was smudged to the top and bottom lash lines. For the cheeks, a beautiful coral shade, MAC Something Special Cremeblend Blush was buffed high up the apples of the cheeks and MAC Pink Rebel Lustre Drops were added to highlight cheekbones. Lips were filled with Boldly Bare lip pencil and MAC To The Future Pro Longwear Lipcreme (the next product on my wishlist!). The look was finished with MAC Mineralised Skinfinish Natural, False Lash Mascara and False lashes.
.jpg)
The second look was the first transitioned into a more sultry chic look with a bold orange lip.
.jpg)
MAC Feline Eye Kohl (now permanent - finally - hurrah!) lined the top and bottom waterlines. MAC Make Your Mark Pro Longwear Eyeshadow was added all over the lids. MAC #3 lashes were added. Lips were lined with MAC Pro Longwear Lip Pencil in What A Blast! and filled with MAC Pro Longwear Lipcreme in Good To Go (must have shade for summer!).
Some notes:
Peach and orange tones are the trend this year! Both the light peach and bright orange lipsticks are must-haves this summer. I also have my eye on Something Special blush.
The MAC Pro Longwear range (as the name implies) offers a lot of long-wearing products. It's great not having to reapply so much especially during important busy occasions.
MAC To The Future Pro Longwear Lipcreme is soo beautiful, especially in person. It brightens up your face!
The ever-recurring limited edition super-black eye pencil, MAC Feline eye kohl, is now permanent!
Primers are important for a smooth application and longer-lasting makeup.
Natural-looking glowy dewy skin is in and super-flattering. I'll leave matte skin for the colder months.


 A rare smiling FOTD photo - I'm actually pretty conscious about my teeth up close, hence the lack of these.

Cher, Our Model, Me

Want visibly plumper lips without the surgery? Look no further!


This product also comes with lip plumping honey. This product works like other lip plumping glosses like the MAC Plushglasses and NYX Pump It Up Lip Plumpers. It irritates your lips and makes them swell up. Just be careful not to apply too much as it can sting!

Plumped up with MAC Cherry Lip Pencil

Subscribe to:
Posts (Atom)







.JPG)
.JPG)


